If there is a threat to your safety INSIDE your building, like a fire, bomb threat, or an active assailant, you must EVACUATE. Each occupied building has a dedicated webpage with information unique to that building and its occupants. Rally point, assembly area, and assistance center maps for each building will show you where to go. The National Fire Protection Agency (NFPA) publishes a comprehensive list of FAQs for building evacuation.
Evacuation Zones & Assembly Areas
UMBC’s standard is to position evacuation rally points at least 50 feet and assembly areas at least 500 feet from any building evacuated for a non-security threat. A security-related threat, like a bomb threat or an active assailant, may require building occupants to evacuate to another location further away.
- Emergency Conditions: Conditions that may endanger the campus and warrant cancellation of classes or release of employees. Building occupants & pedestrians subject to emergency conditions must follow instructions to seek shelter or evacuate.
- Nuisance Alarms: Alarms we can confirm do not pose a threat to building occupants.
- Evacuation Zones: There are three zones that reflect threat exposure: hot, warm, and cold. These zones encompass buildings and surrounding outdoor pedestrian areas.
- HOT (EXCLUSION) ZONE: The area with the actual threat or the highest potential exposure.
- Based on the threat, the Incident Commander may limit the hot zone to the interior confines of the impacted facility or extend it to a 500-foot perimeter from the facility.
- Extending the hot zone to a 500-foot perimeter will also require the Incident Commander to establish warm and cold zones.
- The Incident Commander determines if other occupied buildings & pedestrian areas in these zones are subject to emergency conditions, must evacuate, or seek shelter.
- WARM (REDUCTION) ZONE: A transition area between the hot and cold zones.
- An additional 500 feet from the hot zone; 1,000 feet from the evacuated facility.
- Responders enter and exit the hot zone via the warm zone.
- Hot zone evacuees normally move to the warm zone for rescue operations.
- COLD (SUPPORT) ZONE: Safely position command posts and staging areas here.
- An additional 500 feet from the warm zone; 1,500 feet from the evacuated facility.
- Unless the Incident Commander states otherwise, facilities in the cold zone are not subject to emergency conditions, may continue activities, or may shelter evacuees.
- Assistance sites: These are locations set at a safe distance from the incident where UMBC students, faculty, and staff can reunite with family members or guardians.
- Use these if occupants must evacuate for extended periods and need secure cover.
- Determine the safest, most practical location based on HOT/WARM/COLD ZONE.
- Evacuation rally points and assembly areas for each building are positioned in a way that trends evacuated occupants toward the safest assistance site.
Evacuation Planning Assumptions
- Nuisance alarms require flexibility in response. They are likely to be the cause of most evacuations, especially in residential buildings late at night/during early morning hours.
- Actual high-impact threats are less likely. Evacuating the 500-foot hot zone will be rare.
- The potential risk of bomb threats and other high-impact threats would require multiple buildings within the hot and warm zones to evacuate. This would impact more people.
- High-impact threats will require evacuees to walk farther to reduce their exposure. Individuals with functional or accessibility needs may require more assistance.
- Zone perimeter distances may not align with existing requirements of external response partners but will provide us with a standard to use for planning and training purpose.
- Go to your Rally Point (RP): Occupants evacuate and report to their rally point.
- Rally points are positioned at least 50 feet from the impacted building.
- Leaders have three objectives at the rally point: 1) confirm the nature of the alarm; 2) determine threats to occupant safety; and 3) account for all their personnel.
- If Police confirm a nuisance alarm and give the all-clear, occupants may reenter.
- If there is an actual threat to occupant safety, evacuees will move to their primary assembly area (or alternate assembly area ONLY if instructed).
- Go to your primary assembly area (PRI AA): An outdoor location in the warm zone.
- The 500-foot distance reduces the risk that evacuees will interfere with responders.
- On-scene responders can keep eyes-on evacuees and engage in rescue if needed.
- Evacuees will be less likely go astray, aiding in safety, control, and accountability.
- Positions evacuees closer to the cold zone if conditions worsen.
- It reduces the need for multiple fallback points simplifying training and planning.
- Or…go to your alternate assembly area (ALT AA): This may be indoors in the warm zone. Expect to use these rarely. Go here ONLY IF DIRECTED to do so under two conditions:
- 1) There is a safety or security concern at their outdoor primary assembly area; or
- 2) Evacuation occurs during inclement weather.
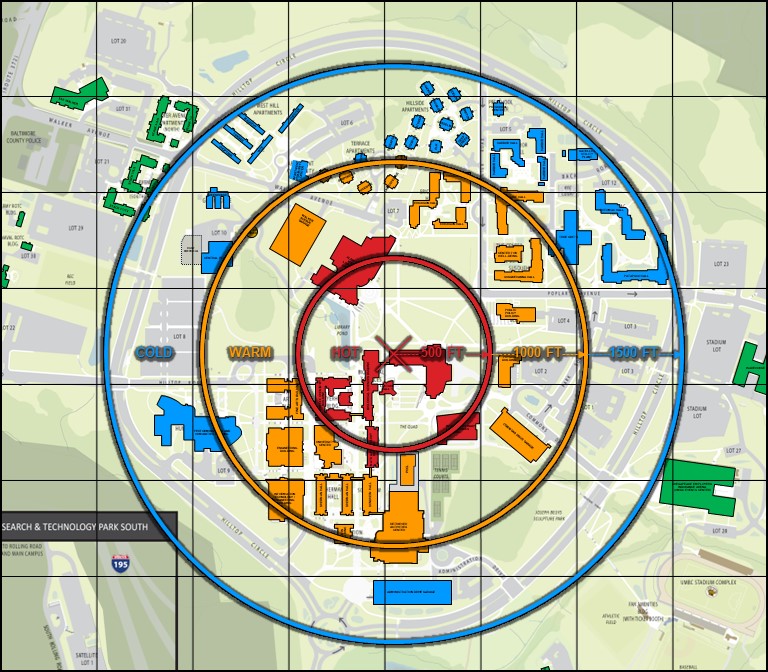
Example 1: Hot, Warm, and Cold Zones
This is an example of an incident centered at the north corner of The Commons. Color-coded buildings on the map below indicate evacuation status. Click on the map for a larger view.
- HOT (EXCLUSION) ZONE: Based on the threat, either: 1) limited to the interior confines of the evacuated facility; or 2) a 500-foot perimeter from the facility.
- WARM (REDUCTION) ZONE: An additional 500-foot perimeter from the hot zone; 1,000 feet from the evacuated facility.
- COLD (SUPPORT) ZONE: An additional 500-foot perimeter from the warm zone; 1,500 feet from the evacuated facility.
- NO IMPACTS: Depending on the nature of the threat, the Incident Commander may determine buildings outside the cold zone can continue normal operations.
Assisting First Responders
Directional indicators: UMBC applies directional indicators to each structure on campus. This provides first responders with immediate orientation using the method prescribed by the Incident Command System (ICS).
- Each structure on campus, regardless of its position, compass direction, or shape, shall have four (4) sides: A (“alpha”), B (“bravo”), C (charlie”), and D (“delta”).
- The side commonly understood as the “front” shall be assigned “Side A.” Sides B, C, and D shall always be designated in clockwise order from Side A.
- Generally speaking, if you are looking at Side A, then you would be positioned at the side commonly understood as the front of the structure.
- Therefore, Side B would always be the left side of the structure, Side C the back of the structure, and Side D the right side of the structure. This method provides easier orientation than north, south, east, or west.
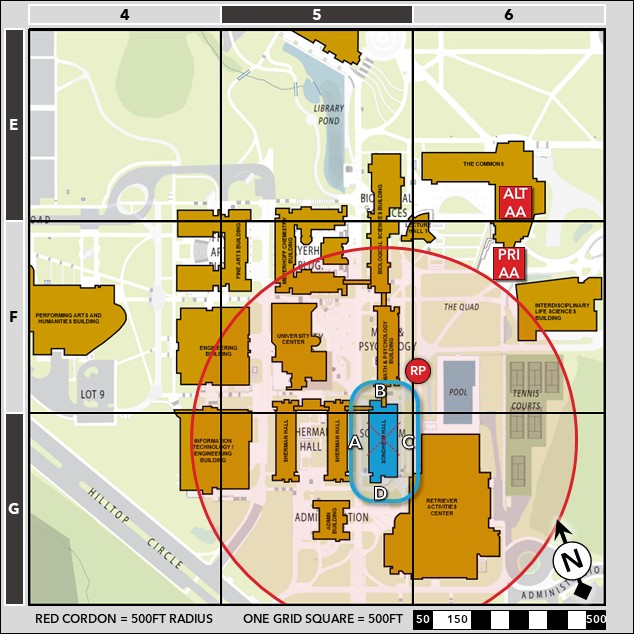
Example 2: Evacuation Map
The example below is for Sondheim Hall, illustrated on its evacuation map. Click on the map for a larger view.
- Side A is the main entrance along academic row, facing Sherman Hall.
- Moving clockwise, Side B faces Math/Psych, Side C faces the RAC, and Side D faces the Administration Building courtyard.
- The rally point (RP) is positioned outside the 50-foot blue perimeter, trending toward the assembly areas.
- The primary assembly area (PRI AA) is outside and beyond the 500-foot hot zone.
- The alternate assembly area (ALT AA) is inside The Commons, beyond the hot zone.
- The rally point and both assembly areas trend toward the safest assistance site.
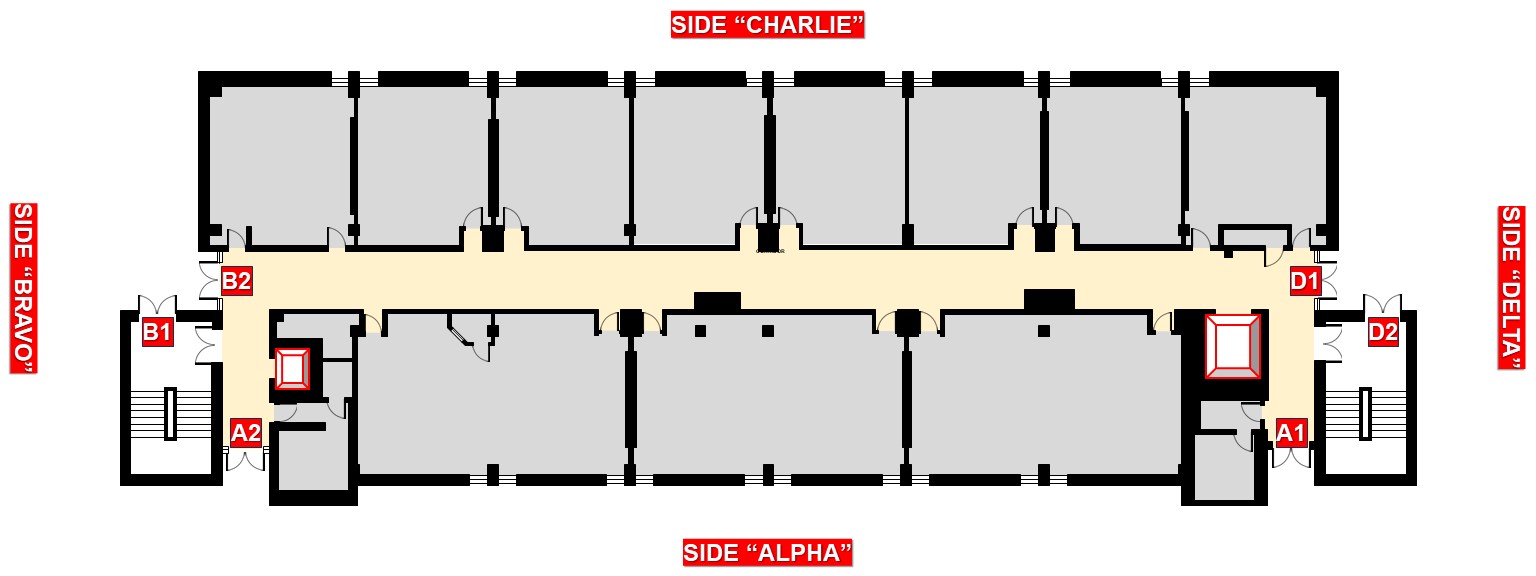
Example 3: Emergency exits
The example below is for Sondheim Hall orientation using ground level exterior emergency exits. Numbering ground level exterior emergency exits on each side helps improve orientation for first responders. Click on the floorplan for a larger view.
- In this example, Side A has two exits: A1 & A2.
- Moving clockwise, exits on Side B are: B1 & B2.
- There no exits on Side C, and two on Side D: D1 & D2.
- Restarting at 1 tells us how many exits are on each side.